MetaGuide page
Source: MetaGuide

MetaGuide page
Source: MetaGuide
Raspbian is the Foundation’s official supported Operating System.
Third party Operating System are also available.
https://www.raspberrypi.org/downloads/
Raspberry pi 是一部微型電腦, 與一般桌上電腦的最大分別是其採用 ARM 架構的 cpu, 而不是 x86 。Raspberry pi 所用的 OS 以 Linux 為主, 其中一個原因是 Linux 是免費和開放的, 加上 Linux 於 ARM 架構上有效能和(Open Source Software OSS)軟件數量上的優勢, 因此 Linux based OS 成為主流 Raspberry pi 的 OS, 亦配合 Raspberry pi 鼓勵學習 programming 創作的理念。 除了官方 Raspbian 外, 還有其他建基於 Linux 的 OS, 這些 OS 普遍以 Debian Linux Distribution 作為基礎並針對各種特別的需要而建立專案形式的系統, 如專供影音的 OS、Hi-end audiophile 的 OS 等等。 自上年開始, 以 Debian 為基礎的 Ubuntu Linux Distribution 提供專屬 Raspberry pi 的 OS, 因此大量 ubuntu x86 的 application 和 library 開始被 port 到 ARM 的 Raspberry pi 上行, 亦使得 Raspberry pi 有更多軟件和驅動程式 (driver) 可供玩家使用。 現在進階玩家普遍採用第三方客製化 的 OS, 因為它們幾乎都因應特別需要, 對系統效能作微調和預載特別的軟件, 因此玩家只要安裝這些客製化的 OS , 便能使用已 fine tune 的系統。 這兩年針對天文使用的 Raspberry pi OS 主要有 Anat 的 Iastrohub 和 Max Chen 的 TinyAstro, 而台灣同好亦即將發布 AiGO (StarFruit Pi) 這個天文專案的 Raspberry pi OS。
Reference:
AIGO –> https://www.facebook.com/groups/1754166918205014/
TinyAstro –> https://www.cloudynights.com/topic/5032 … starsindi/
iAstrohub –> https://www.cloudynights.com/topic/5519 … otography/
有關 ccd 支援情況, 請自行參閱 Lin guider 和 PHD2 的官方介紹。至於導星鏡的選擇涉及導星鏡和主鏡 image scale (pixel scale) 的比率、seeing 等因素, 請自行學習。
Reference link:
https://stargazerslounge.com/topic/1887 … eshooting/
http://www.wilmslowastro.com/tips/autoguiding.htm
http://blog.xuite.net/abracad100/twblog/111631815
PHD2 reference:
Official web page: http://openphdguiding.org/
Original source code: https://github.com/OpenPHDGuiding/phd2
Support forum: https://groups.google.com/forum/?fromgr … hd-guiding
Lin_guider reference:
https://sourceforge.net/projects/linguider/
Lin guider 的原理是以 PID control loop system 為基礎, 但暫時只有 P 和 I 設定值是生效的。PI 要經過試驗才能找到最合適的數值, 先增加 P 值再觀測 導星情況, 找出合適數值後, 再考慮是否需要增加 I 值 。
Maximum pulse 值是指定發出修正訊號 “pulse signal” 的上限時間, 通常不用調整。Minimum pulse 值較為重要, 因為低於此值的修改訊號會被忽略, 即不會作出任何修正。
PID control coefficients adjustment should by performed empirically, using the specific equipment and with full load. The idea of the adjustment is to find coefficients that don’t lead to ‘under-guiding’ (corrections are too slow) or ‘over-guiding’ (sinusoidal oscillations with increasing amplitude).
It is recommended to choose the range of values from 10 to slightly more than the recommended value during the selection of the proportional coefficient (see ‘Info’ block) and move through this region with the step of 10, looking attentively, how the result of the guiding will change.
The selection of the integral coefficient is recommended to perform, if there is constant impact in one direction. This coefficient will allow for the faster correction of the impact, because it takes into account the previous guiding history.
The differential coefficient, as has been said above, is disabled at the moment.
Reference:
http://norikyu.blogspot.hk/p/linguider-pid.html
10 分鐘 guiding 測試 (QHY5-II-L-M ,Raspberry Pi2)
http://www.hkastroforum.net/viewtopic.p … ht=#296209
Reference:
https://github.com/OpenPHDGuiding/phd2
https://stargazerslounge.com/topic/1887 … eshooting/
INDI亦被視為 Linux 系統上的 ascom, 天文儀器/硬件只需直接連到一台裝有 INDI Server 以及相關硬件的 INDI Driver 的電腦, 便能透過 INDI Client 來控制。現在 INDI 已有 Raspberry pi 相容的版本, 只要將天文儀器硬體, 如自動導星 ccd 和 go-to 赤道儀直接連到 Raspberry pi , 便能透過 INDI client 作本機或遙距 (網路) 控制。
INDI Starter 是 Linux 上一個簡單的圖形介面工具, 不熟悉 Linux 電腦指令的人便能透過 INDI Starter 作啟動或關閉 INDI Server 以及增加或減少硬件的 INDI Drivers。
INDIGO
現在 Rumen Bogdanovski 和 Peter Polakovič 正積極地開發第二代 INDI (protocol), 名為 INDIGO 以彌補現在 INDI 的不足。
Reference:
http://indilib.org/about/contributors/1 … owney.html
http://www.clearskyinstitute.com/INDI/INDI.pdf
http://indilib.org/about/discover-indi.html
http://indilib.org/about/clients.html
http://www.cloudmakers.eu/indiserver/
https://sourceforge.net/projects/indistarter/
http://www.indigo-astronomy.org/
除此之外, 大家亦可以透過平版電腦或手機上的兩套軟件, SkySafari plus/pro 和 Kstars lite 來控制連接到 Raspberry pi 上的赤道儀。
SkySafari plus/pro 是透過 ser2net 這套安裝在 raspberry pi 的軟件來控制赤道儀而 Kstars lite 是透過安裝在 raspberry pi 上的 INDI driver 來控制。由於 SkySafari 本身有支援特定的赤道儀, 所以與 INDI driver 所支援的可能有分別, 由於我沒有 go-to 赤道儀, 所以 沒有查看當中的分別。 如果只是想用 go-to 功能, 我建議用 SkySafari plus/pro , 相比用 vnc 遙控操作 raspberry pi 上的 Kstars, 用手機/平板上的 SkySafari 會容易和簡單得多, 因為它是為平板和手機而設計, 使用 usb – rs232 連接 raspberry pi 和赤道儀即可使用, 不必購買 skyfi。
Kstars lite 也是為平板和手機而設, 但是剛剛起步和有很多 bug, 暫時不建議使用, 作試驗性質尚可。
SkySafari pro and Kstars mount control demo:
https://youtu.be/siUAqxLLq_A
https://youtu.be/c4AyoAwbDeE
https://www.youtube.com/watch?v=LyGY3tXyoWI
Reference:
https://edu.kde.org/kstars/
https://www.youtube.com/watch?v=3uwyRp8lKt0
http://www.ap-i.net/skychart/en/start
http://www.stellarium.org/
http://skysafariastronomy.com/
https://play.google.com/store/apps/deta … s&hl=zh_HK
gphoto2 這套軟件需要用指令操作並沒有原生的圖形介面 (GUI), 想使用圖形介面就要靠安裝第三方的前端 (Front end) 軟件又或是自己編寫。
支援 gphoto2 高階功能的前端軟件不多, 主要是 Kstars、 Entangle、darktable 和 digikam, 當中以 Kstars 專為天文攝影而設計, 同好可以利用 Kstars 作對焦以及配合自動導星軟件作 dithering 和排程攝影。除了 Kstars之外 , Entangle 最能配合 raspberry pi, 因它對硬體效能要求較少以及其針對 tethering 拍攝的設計, 但我認為除了使用 live view 作對焦外,用 gphoto2 指令控制是最有彈性的, 所以網路上能找到很多以 python 或其他語言寫成的 DSLR 控制程式, 當然也不乏天文同好自己寫的程式, 但用 Entangle 的原因當然是它的圖形控制介面, 亦可以用其 live view 功能作對焦, 唯一問題是 raspberry pi3 效能有限, live view 時反應稍為緩慢。
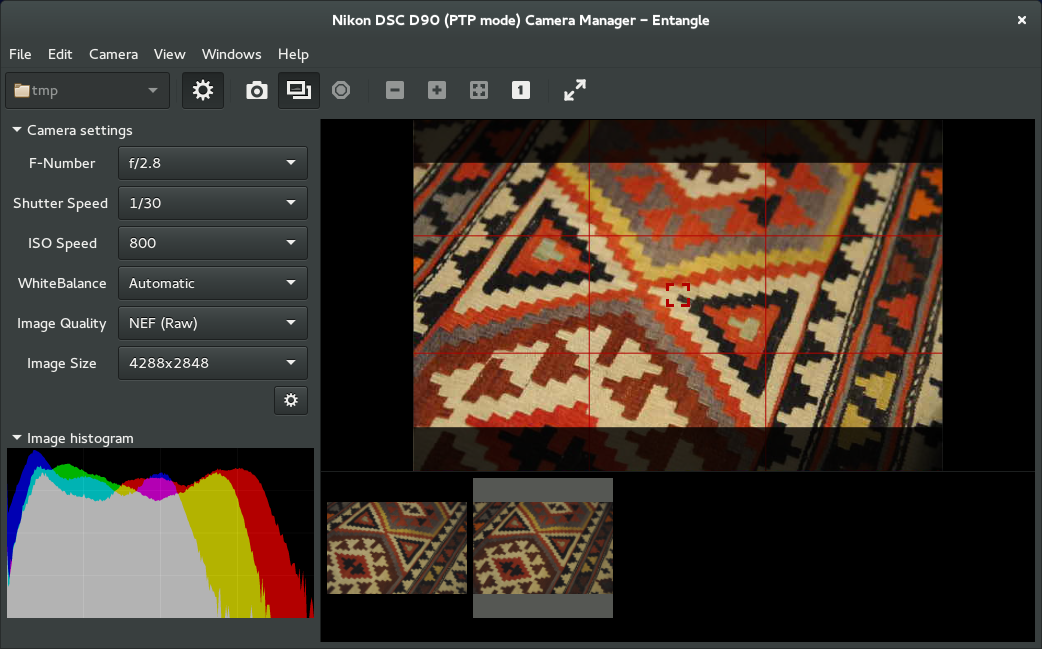
於 Raspberry pi 安裝 Entangle 並不困難, 但想要最新版本就需要用原始碼 自行編譯 (compile)。
雖然 Entangle 的遙距拍攝功能完善, 但我未能成功使用 Nikon 作 B 快門拍攝, 這應該是 Entangle 對 Nikon Bulb mode 支援的問題所致。事實上只有近年新出的 Nikon 機種才能以 usb tethering 方式作 Bulb mode 拍攝 (Nikon D600 或更新的機種但不包括 D3xxx 的機) , 而 Canon 機就普遍沒有問題。幸好我用的 Nikon 機是近年的機種, 所以能透過 gphoto2 指令來進行 B 快門拍攝 ( 雖然 Entangle 未能支援我的 Nikon) , 甚至配合 Lin guider 作 dithering。
Entangle 對需求 tethering 拍攝的影友可能更具吸引力。
至於 Sony DSLR, gphoto2 也支援 Sony Alpha A7 series 的 usb tethering 作 Bulb 拍攝, 詳情請參閱 gphoto2 官方網站。gphoto2 亦是縮時攝影 (Time-lapse) 的利器。
對於我這個只用 DSLR 作星空攝影的入門初哥, 用不着 Kstars 這些複雜軟件, 這是我用的定時快門程式並支援 Lin guider 的 dither 功能, 但暫時只支援 Nikon DSLR, 使用者只需因應自己 Linux 系統的情況, 修改程式內的預設影像儲存位置就能使用, 由於此程式只是用作排程, 系統必須安裝 gphoto2 才能使用, dither 功能就要安裝 Lin guider。程式亦備有 web 控制介面, 但暫時未曾釋出。
https://github.com/QK-sampson/astroCap/ … strocap.sh
這張相是用此程式配合 Lin guider 作 dither 而影的: http://qqkkd.blogspot.hk/2016/07/dither … 8-m20.html
Reference:
https://www.youtube.com/watch?v=qRsAqTL4ZZI (Using Canon DSLR in Kstars/Ekos)
http://www.gphoto.org/doc/remote/
https://entangle-photo.org/
http://www.timelapseplus.com/compatability/
https://sourceforge.net/p/gphoto/feature-requests/462/
https://bitbucket.org/tstibor/deepskytools
http://qqkkd.blogspot.hk/2016/11/dslr-c … ither.html
http://www.darktable.org/
https://www.digikam.org/
安裝現成的 vnc server 是最簡單又容易使用的方法。使用 vnc 遙控亦省卻了外置 LCD 螢幕、滑鼠和鍵盤, 大大增加 raspberry pi 的便攜性, 因為只需用一部裝有 vnc viewer 軟件的電腦、平板或手機就可以透過網絡遙控 Raspberry pi 的整個系統。
Raspberry pi 具備 WiFi 和固網接口 RJ45, 使用者只需將 Raspberry pi 連到網絡就能以 vnc 作遙距控制。對於我們到戶外進行拍攝的用家, 一般會為 Raspberry pi 安裝 hostapd 軟件, 使其內置的 WiFi “接收器”轉變為 WiFi 熱點(access point) 供平板和手機等連上, 用家只需為自己的 Raspberry pi WiFi 熱點改一個獨有的 SSID 名稱和密碼, 便可以在戶外直接連線到自己的 Raspberry pi 並開啟 vnc viewer 來遙控系統, 但也有同好帶備迷尼WiFi路由器到戶外, 透過路由器同一時間遙控多台 Raspberry pi 、 Windows pc (赤道儀、CCD 和 DSLR 等設備)。對於那些擁有固定天文台的用家, 使用 Raspberry pi 的固網 (RJ45) 會較為穩定, 而且能透過互聯網作遠端遙控, 猶如使用 i-telescope。
Windows、Android 的 vnc viewer 軟件衆多, 可以輕易安裝, 亦可使用以下軟件。
Android → https://play.google.com/store/apps/deta … er.android
Windows → http://www.tightvnc.com/
MacOS → https://www.realvnc.com/download/vnc/macosx/
Reference:
https://play.google.com/store/apps/deta … r&hl=zh_HK
https://play.google.com/store/apps/deta … e&hl=zh_HK
https://www.cloudynights.com/topic/4936 … id-device/
2. 想問問 raspberry 是 Linux base. 而 AiGO (starfruit pi) 内的操作,或基本操作指引在那裡可以找到?
Linux 完全不像 Microsoft Windows, 它沒有 standard 桌面環境 (X Window, Desktop Environment) 和應用程式, 玩家可以選擇安裝自己喜愛的 x Window 和應用程式, Linux 至少有數十種不同的 x Window, 各有特色, 有超華麗至超簡單任人選擇。應用程式就更多。而 AiGO (StarFruit pi) 只裝了極省資源和超簡單的 LXDE desktop environment, 亦沒有安裝不必要的 application 如 office.
To be continued..
小弟所製的 OS 只用自己的器材測試, 如果有同好想利用 raspberry pi3 作自動導星, 可以考慮下載台灣同好所建立的 AiGO , AiGO developers 有較廣泛的器材測試, 因而建議使用。
下載台灣同好所建立的 AiGO ( https://drive.google.com/file/d/0Bw_cLC … hiQlE/view )
AiGO user manual ( https://drive.google.com/open?id=0Bw_cL … Uo2aHB0dkU )
本人年多前開始學習自動導星, 但又不想花數千元購入手提電腦, 為的只是自動導星, 更何況還需花錢購買導星鏡和 ccd, 最重要的原因是我無能力帶多部手提電腦和後備電源, 因為我不是自駕人士,每次攝星都要帶十幾二十 kg 的設備,又拉車又背囊去到郊區地方, 於是開始從外國網站上學習怎樣安裝和使用 Raspberry pi 作自動導星, 經過多次嘗試和學習, 現在總算有少許成果, 可以實現遙控自動導星、遙控 DSLR (Nikon D5300) 和配合導星軟件作 Dithering , 希望在此分享給有興趣的同好, 提供多一個自動導星的方案。
使用 Raspberry pi3 微型電腦進行自動導星有以下優點:
由於本人不是電腦專材, 安裝方法只是參考不同的網站, 請自行衡量風險。此方案採用 Linux 系統和 Lin guider 自動導星軟件, 與 phd2 有所不同, 因此讀者務必自行參考 Lin guider 所能支援的 CCD / CMOS camera 以及其相關的設定。
* 如果不太懂自己安裝, 我可以預製系統和導星軟件的映像檔案, 給有興趣的同好下載, 到時只需使用 Win32DiskImage 燒錄在一張 16G Class 10 Micro SD 咭上即可使用。
這個是預先安裝了下列必要軟件的映像檔 , 請先用7zip解壓後才燒錄。( https://drive.google.com/file/d/0Bw_cLCKHJYJFcDhjMF91ODk0Nmc/view?usp=sharing ),由於此檔案是直接由 16G 咭複製, 請同樣使用 16G 咭燒製,
如用 16G 以上的咭就只會看見 16G 儲存記憶, 需另行將多出的記憶建立 partition 。
User id: pi
Password: raspberry
*這是建基於 RaspEX 的 image ( https://drive.google.com/file/d/0Bw_cLCKHJYJFc2oyTFRwREhFT0E/view?usp=sharing ), 亦是我主力採用的攝星工具, 小弟已將以下的軟件預先安裝, 燒錄到 32G class 10 micro SD 後即
可以使用。由於本人不是電腦專材,軟件的使用方法及詳情, 恕小弟無能力給予幫助, 請到官方網站查閱。MD5 checksum: 403dec3e2576d441c8a29b97a4ddc51e
SkySafari setting (/etc/ser2net.conf, 4100 for Temma 2):
Lin guider: Auto guide
phd2: Auto guide
gphoto2: DSLR control -> http://gphoto.sourceforge.net/
kstars: Star map -> https://edu.kde.org/kstars/
digiKam: Photo management -> https://www.digikam.org/
OpenSkyImager -> https://github.com/OpenSkyProject/OpenSkyImager
ddserver: Controlling Nikon and Canon DSLR using qDslrDashboard -> http://dslrdashboard.info/
Astrometry: Plate solve -> http://astrometry.net/doc/readme.html
銀色的是行動電源:
由於本人不是電腦專材, 安裝方法只是參考不同的網站, 請自行衡量風險。此方案採用 Linux 系統和 Lin guider 自動導星軟件, 與 phd2 有所不同, 因此讀者務必自行參考 Lin guider 所能支援的 CCD / CMOS camera 以及其相關的設定。
* 如果不太懂自己安裝, 我可以預製系統和導星軟件的映像檔案, 給有興趣的同好下載, 到時只需使用 Win32DiskImage 燒錄在一張 16G Class 10 Micro SD 咭上即可使用。
所需硬件設備 , () 內是本人的設備給大家參考:
必要軟件 :
非必要軟件 :
系統安裝方法:
自動導星軟件的安裝方法:
開啟 Raspberry pi3 後並連接到互聯網, 再開啟 terminal 續行輸入以下指令, 有#號項除外(#號項是注解和提示如何修改檔案, 請不要輸入) :
sudo apt-get update
sudo apt-get upgrade
### Access point set up ###
# ssid = Wi-Fi 訊號名稱
# wpa_passphrase = Wi-Fi 密碼
sudo apt-get install dnsmasq hostapd
sudo nano /etc/hostapd/ap.conf
# Add content.
interface=wlan0
hw_mode=g
channel=10
auth_algs=1
wpa=2
wpa_key_mgmt=WPA-PSK
wpa_pairwise=CCMP
rsn_pairwise=CCMP
wpa_passphrase=raspberry
ssid=Raspi3_guiding
# Save and exit
# edit dnsmasq.conf
sudo nano /etc/dnsmasq.conf
# Add content
interface=wlan0
dhcp-range=10.0.0.2,10.0.0.5,255.255.255.0,12h
# Save and exit
# edit rc.local
sudo nano /etc/rc.local
# Delete all content and add
sudo ifconfig wlan0 down
sudo ifconfig wlan0 10.0.0.1 netmask 255.255.255.0 up
sudo iwconfig wlan0 power off
sudo service dnsmasq restart
sudo hostapd -B /etc/hostapd/ap.conf & > /dev/null 2>&1
# Save and exit
# Compile/Install LinGuider
################################################
wget http://ncu.dl.sourceforge.net/project/linguider/4.0.0/lin_guider-4.0.0.tar.bz2
wget http://tenet.dl.sourceforge.net/project/cccd/firmware/firmware-ccd_1.3_all.deb
sudo dpkg -i firmware-ccd_1.3_all.deb
sudo tar -xvf lin_guider-4.0.0.tar.bz2
cd lin_guider_pack/io_ftdi/
sudo apt-get install libftdi-dev g++
sudo ./build.sh
cd /home/pi/lin_guider_pack/lin_guider/
sudo apt-get install fxload libusb-dev libqt4-dev libusb-1.0
./configure
make
sudo cp ./lin_guider /usr/local/bin/
# Create a Launcher on the desktop that runs /usr/local/bin/lin_guider
sudo ln -s /usr/local/bin/lin_guider /home/raspex/Desktop/LinGuider
# Install x11vnc
################################################
sudo apt-get install x11vnc
x11vnc -forever -display :0
#x11vnc auto start up on boot
cd /home/pi/.config
sudo mkdir autostart
cd autostart
sudo nano x11vnc.desktop
### Paste the following text into the file #####
[Desktop Entry]
Encoding=UTF-8
Type=Application
Name=X11VNC
Comment=
Exec=x11vnc -forever -display :0
StartupNotify=false
Terminal=false
Hidden=false
################################################
## Save and exit
完成以上步驟後 logout 並重啟 Raspberry pi3 便完成。重啟後使用手機、平板或電腦查看並連接 Raspberry pi3 所發出的WiFi 訊號,成功連線後便可以使用 vnc 軟件遙控使用 Raspberry pi3, 以我經驗, 十米八米範圍來都不會斷線。
器材設置圖片:
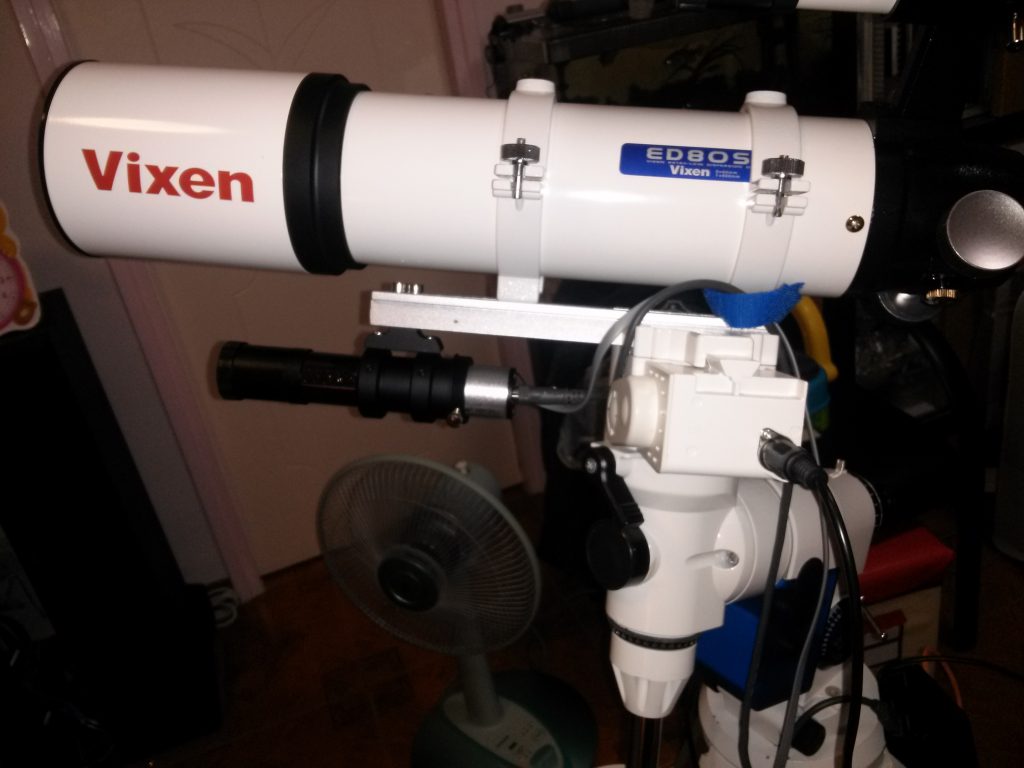
80mm main scope and a mini guide scope
DSLR and Raspberry pi2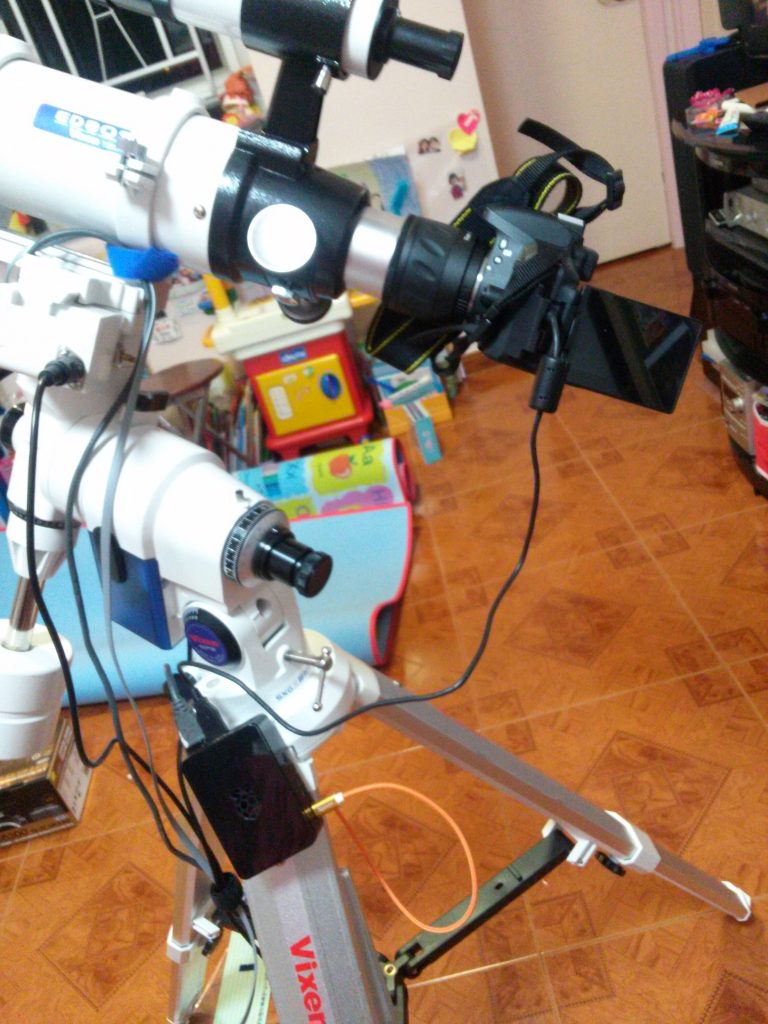
Raspberry pi2 and Lithium battery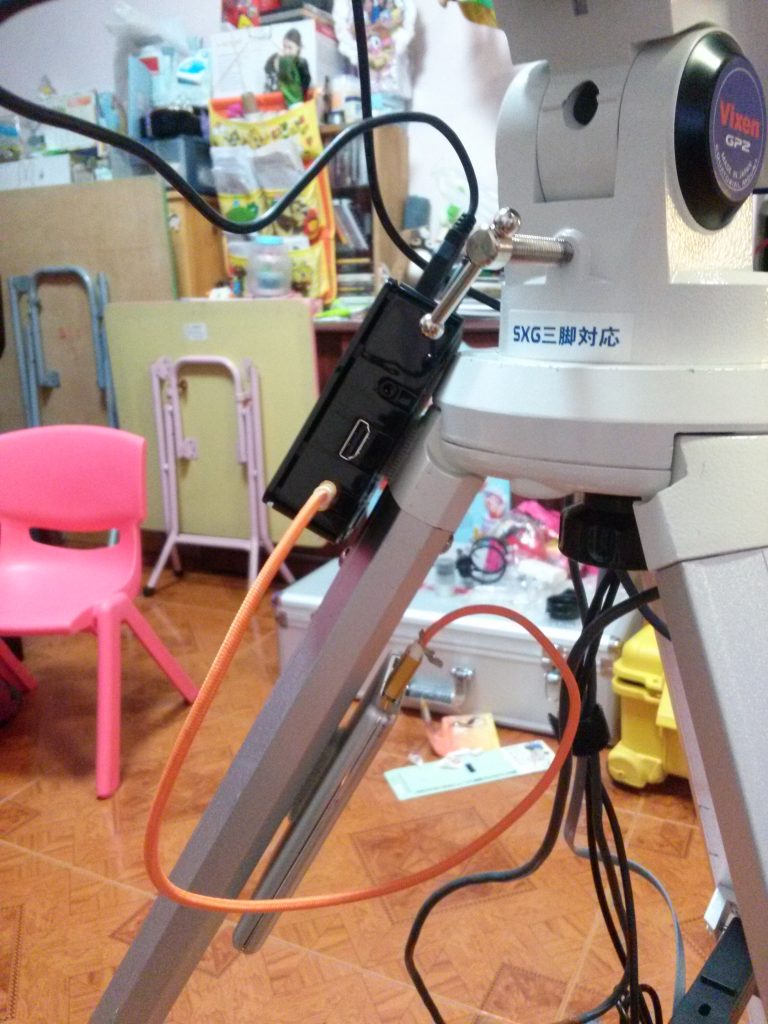
Lin guider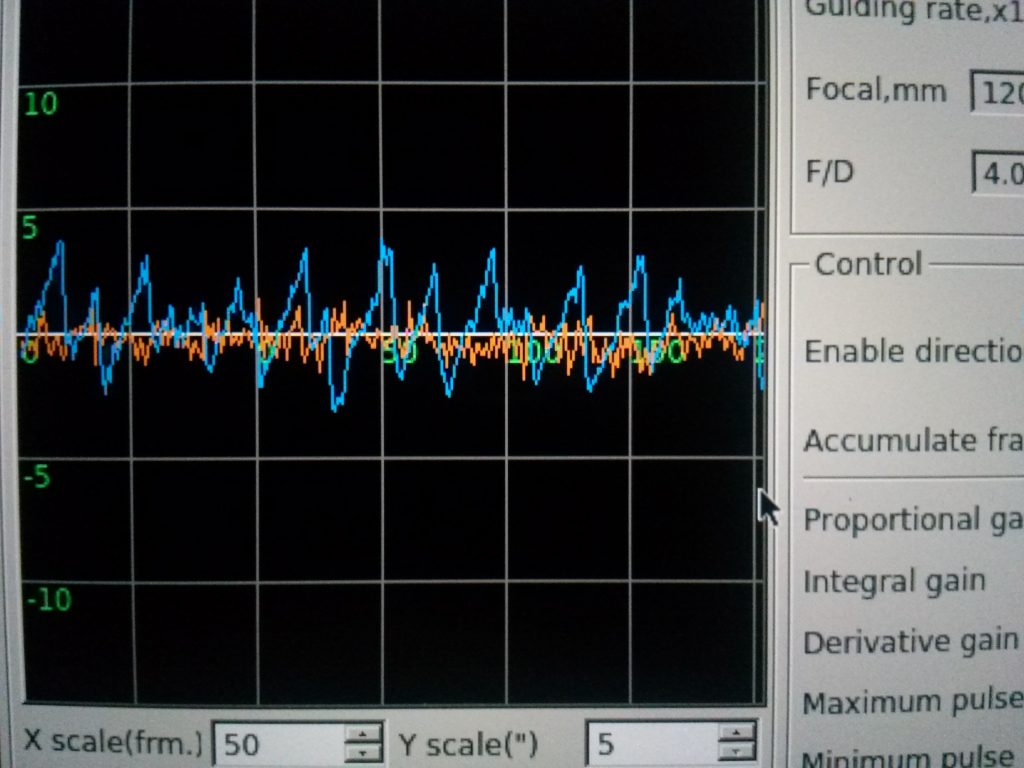
Software reference: